Key takeaways
- Cloud DHCP needs a relay agent on every branch gateway, because Dynamic Host Configuration Protocol (DHCP) broadcasts never leave the local subnet.
- Inventory every scope, reservation and option before you export, so nothing is lost between systems.
- Shorten lease times several days before cutover so clients move to the new server within hours.
- Migrate in site waves, starting with a pilot, and keep a tested rollback path for each site.
- After migration, cloud DHCP becomes a device-identity checkpoint that feeds Zero Trust policy.
Introduction
Every branch DHCP server is another operating system to patch, refresh and monitor. For many enterprises, the deadline is now fixed. Microsoft ends extended support for Windows Server 2016 on January 12, 2027, and security updates stop after that date.
Moving to cloud DHCP removes that server from every site and centralizes address management in one service.
This guide shows network teams how to migrate DHCP servers to the cloud without lease outages. You will learn to assess and export your setup, then connect sites with relay and Internet Protocol Security (IPsec). The guide then covers wave cutover, rollback and decommissioning.
What changes when DHCP moves to the cloud
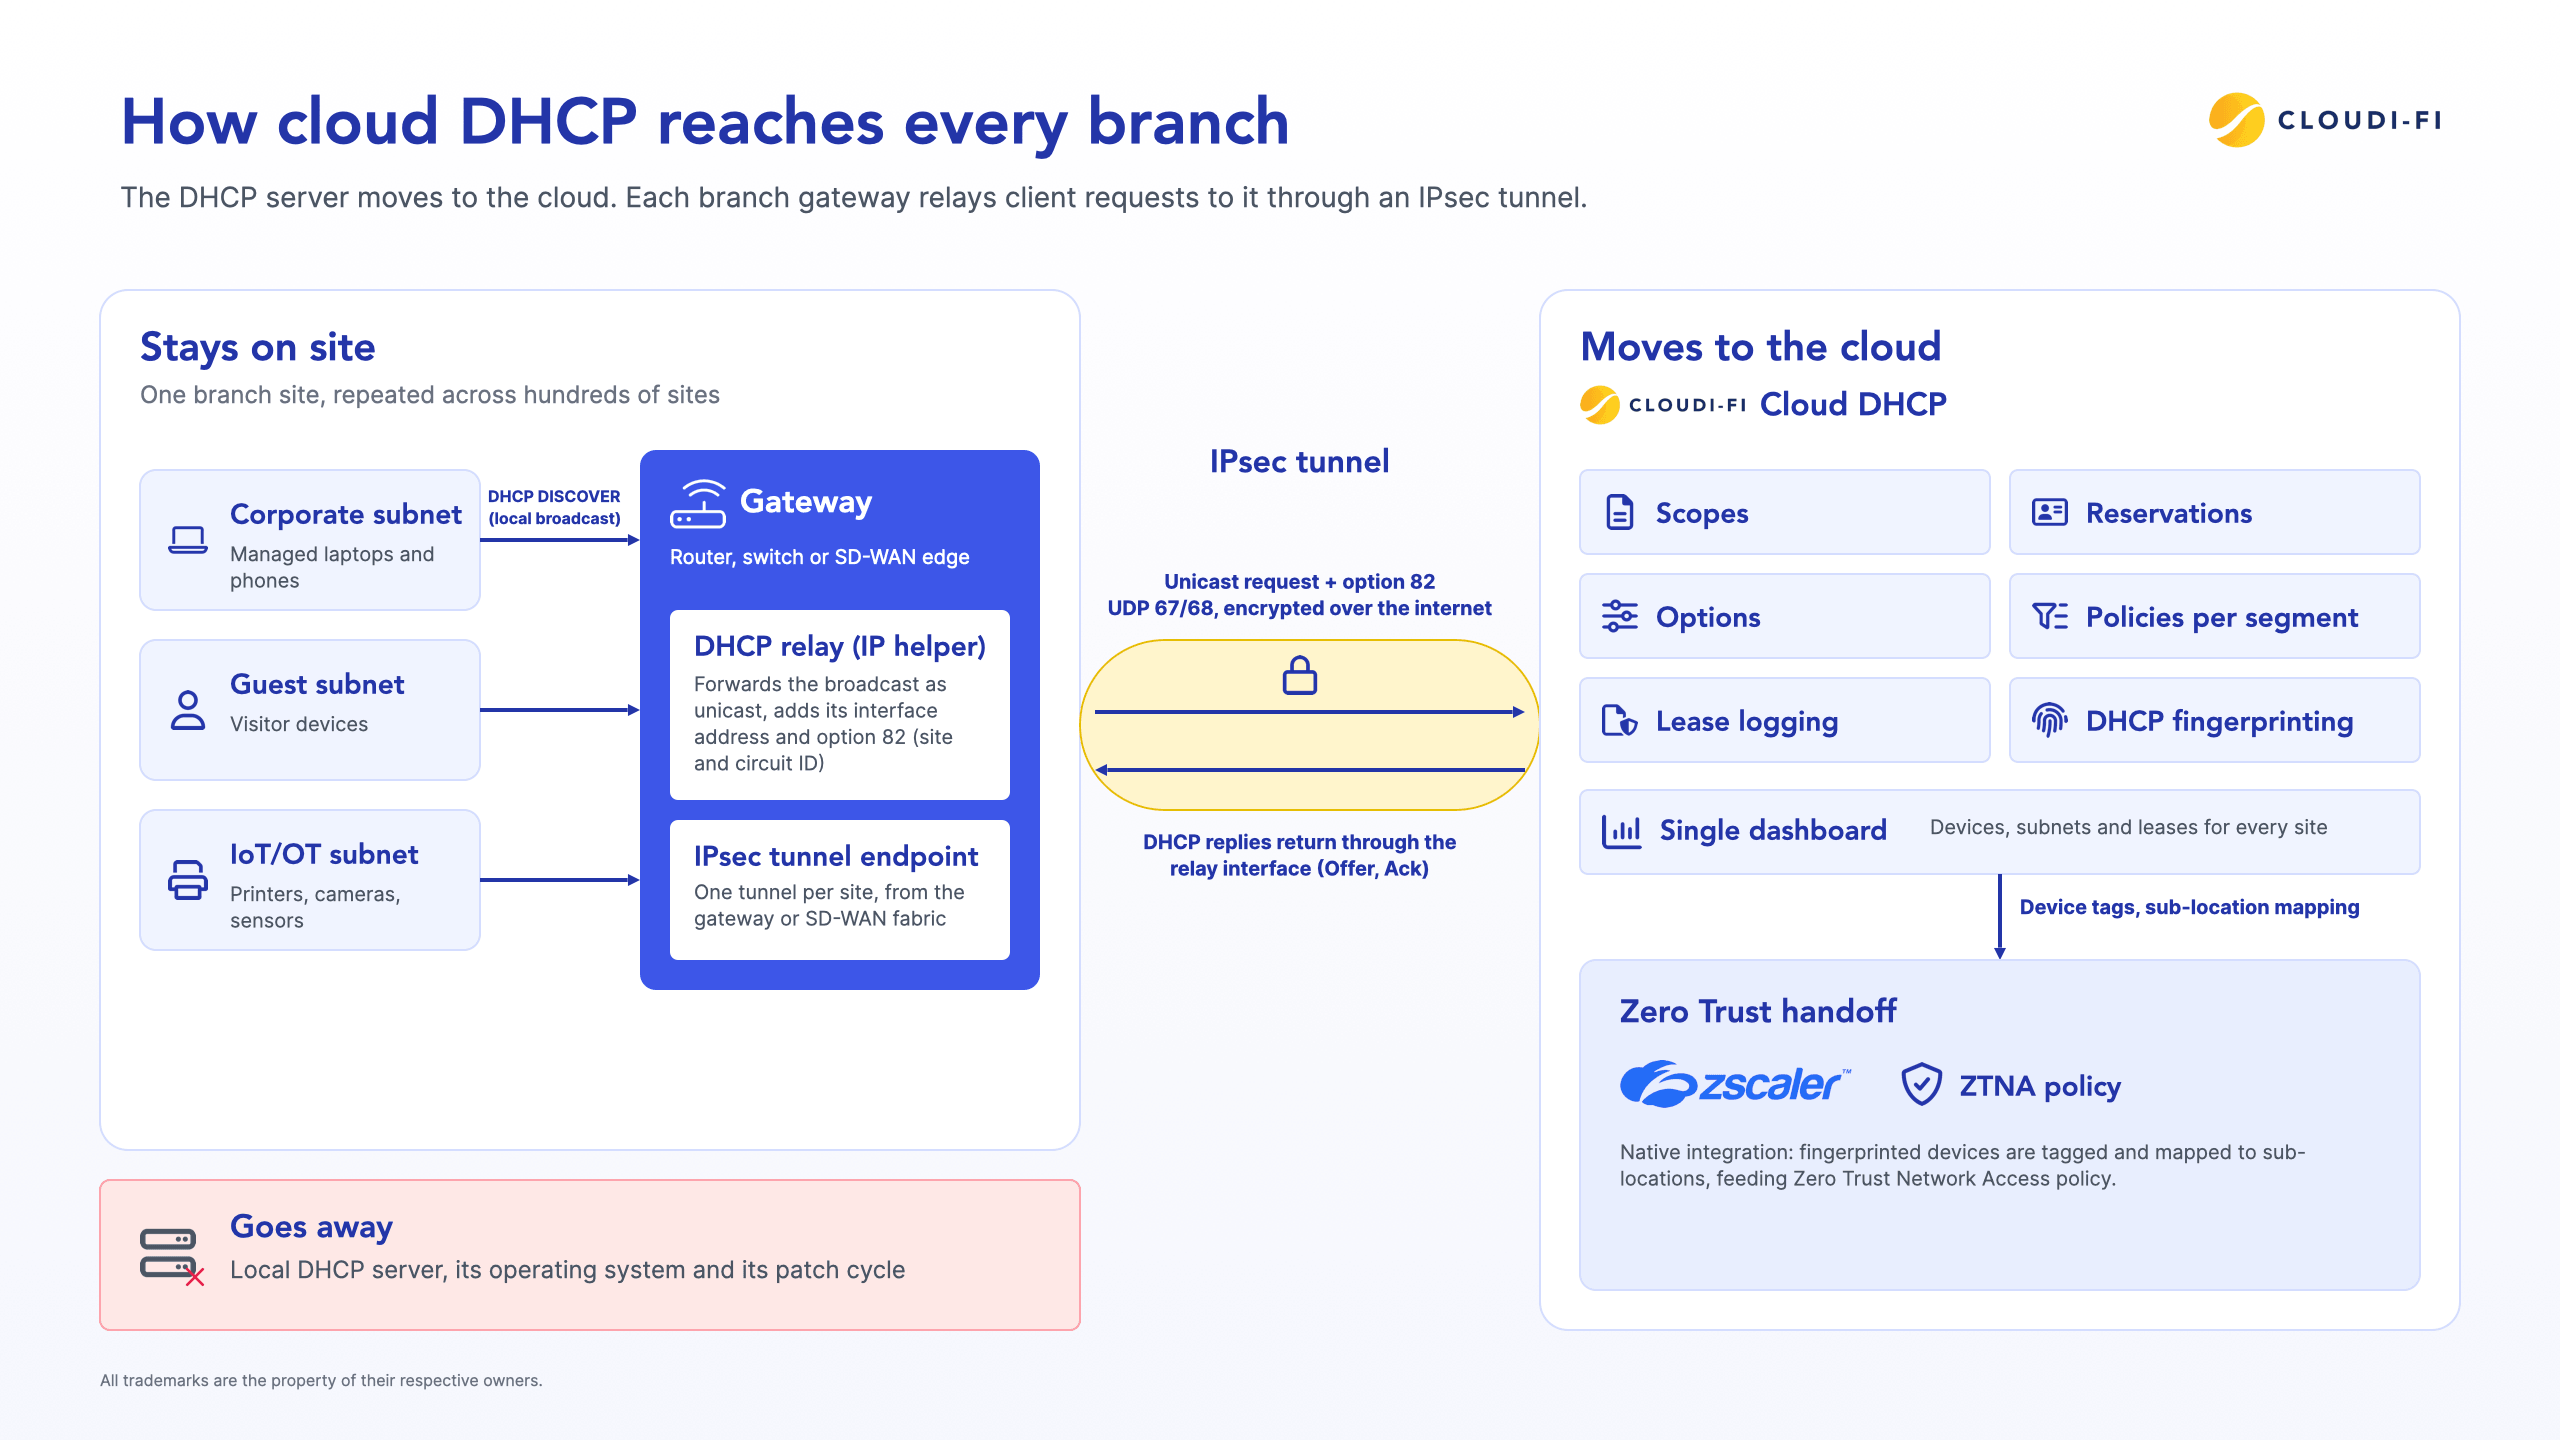
The DHCP server moves off site, but every client request still starts on the local subnet. That one fact drives every migration step.
A new client sends a DHCP DISCOVER as a local broadcast, the first message of the DORA (Discover, Offer, Request, Acknowledge) exchange. Routers don't forward broadcasts, so the request never reaches a cloud DHCP server on its own.
Microsoft Learn confirms that direct client broadcasts don't reach a DHCP server hosted in an Azure virtual network. An on-premises relay agent forwards them as unicast instead.
The relay agent, often called an IP helper, runs on each subnet's gateway. That gateway can be a router, a switch or a software-defined wide area network (SD-WAN) edge.
The relay adds its interface address to the DHCP message and forwards the request to the cloud DHCP server as unicast traffic. That traffic travels through an IPsec tunnel, so DHCP messages cross the internet encrypted. The relay is mandatory: without it, a branch client never gets an address from the cloud.
With hundreds of sites sending requests to one service, the server needs to know where each request came from. RFC 3046 defines the Relay Agent Information option, known as option 82, which the relay inserts into each request. Its Agent Circuit ID sub-option identifies the circuit the request arrived on, so the server can apply site-specific policy.
Here is how responsibilities split after migration:
- Stays on site: The relay configuration, the IPsec tunnel endpoint and the client subnets.
- Moves to the cloud: Scopes, reservations, options, policies and lease logging for every site.
- Goes away: The local DHCP server, its operating system and its patch cycle.
Cloudi-Fi Cloud DHCP follows this model. You configure a DHCP relay and an IPsec tunnel to each site, using your existing infrastructure provider.
The service is infrastructure-agnostic, so it works with the gateways you already run. For DORA and component basics, see our cloud DHCP server explainer.
How to migrate DHCP to the cloud in 7 steps
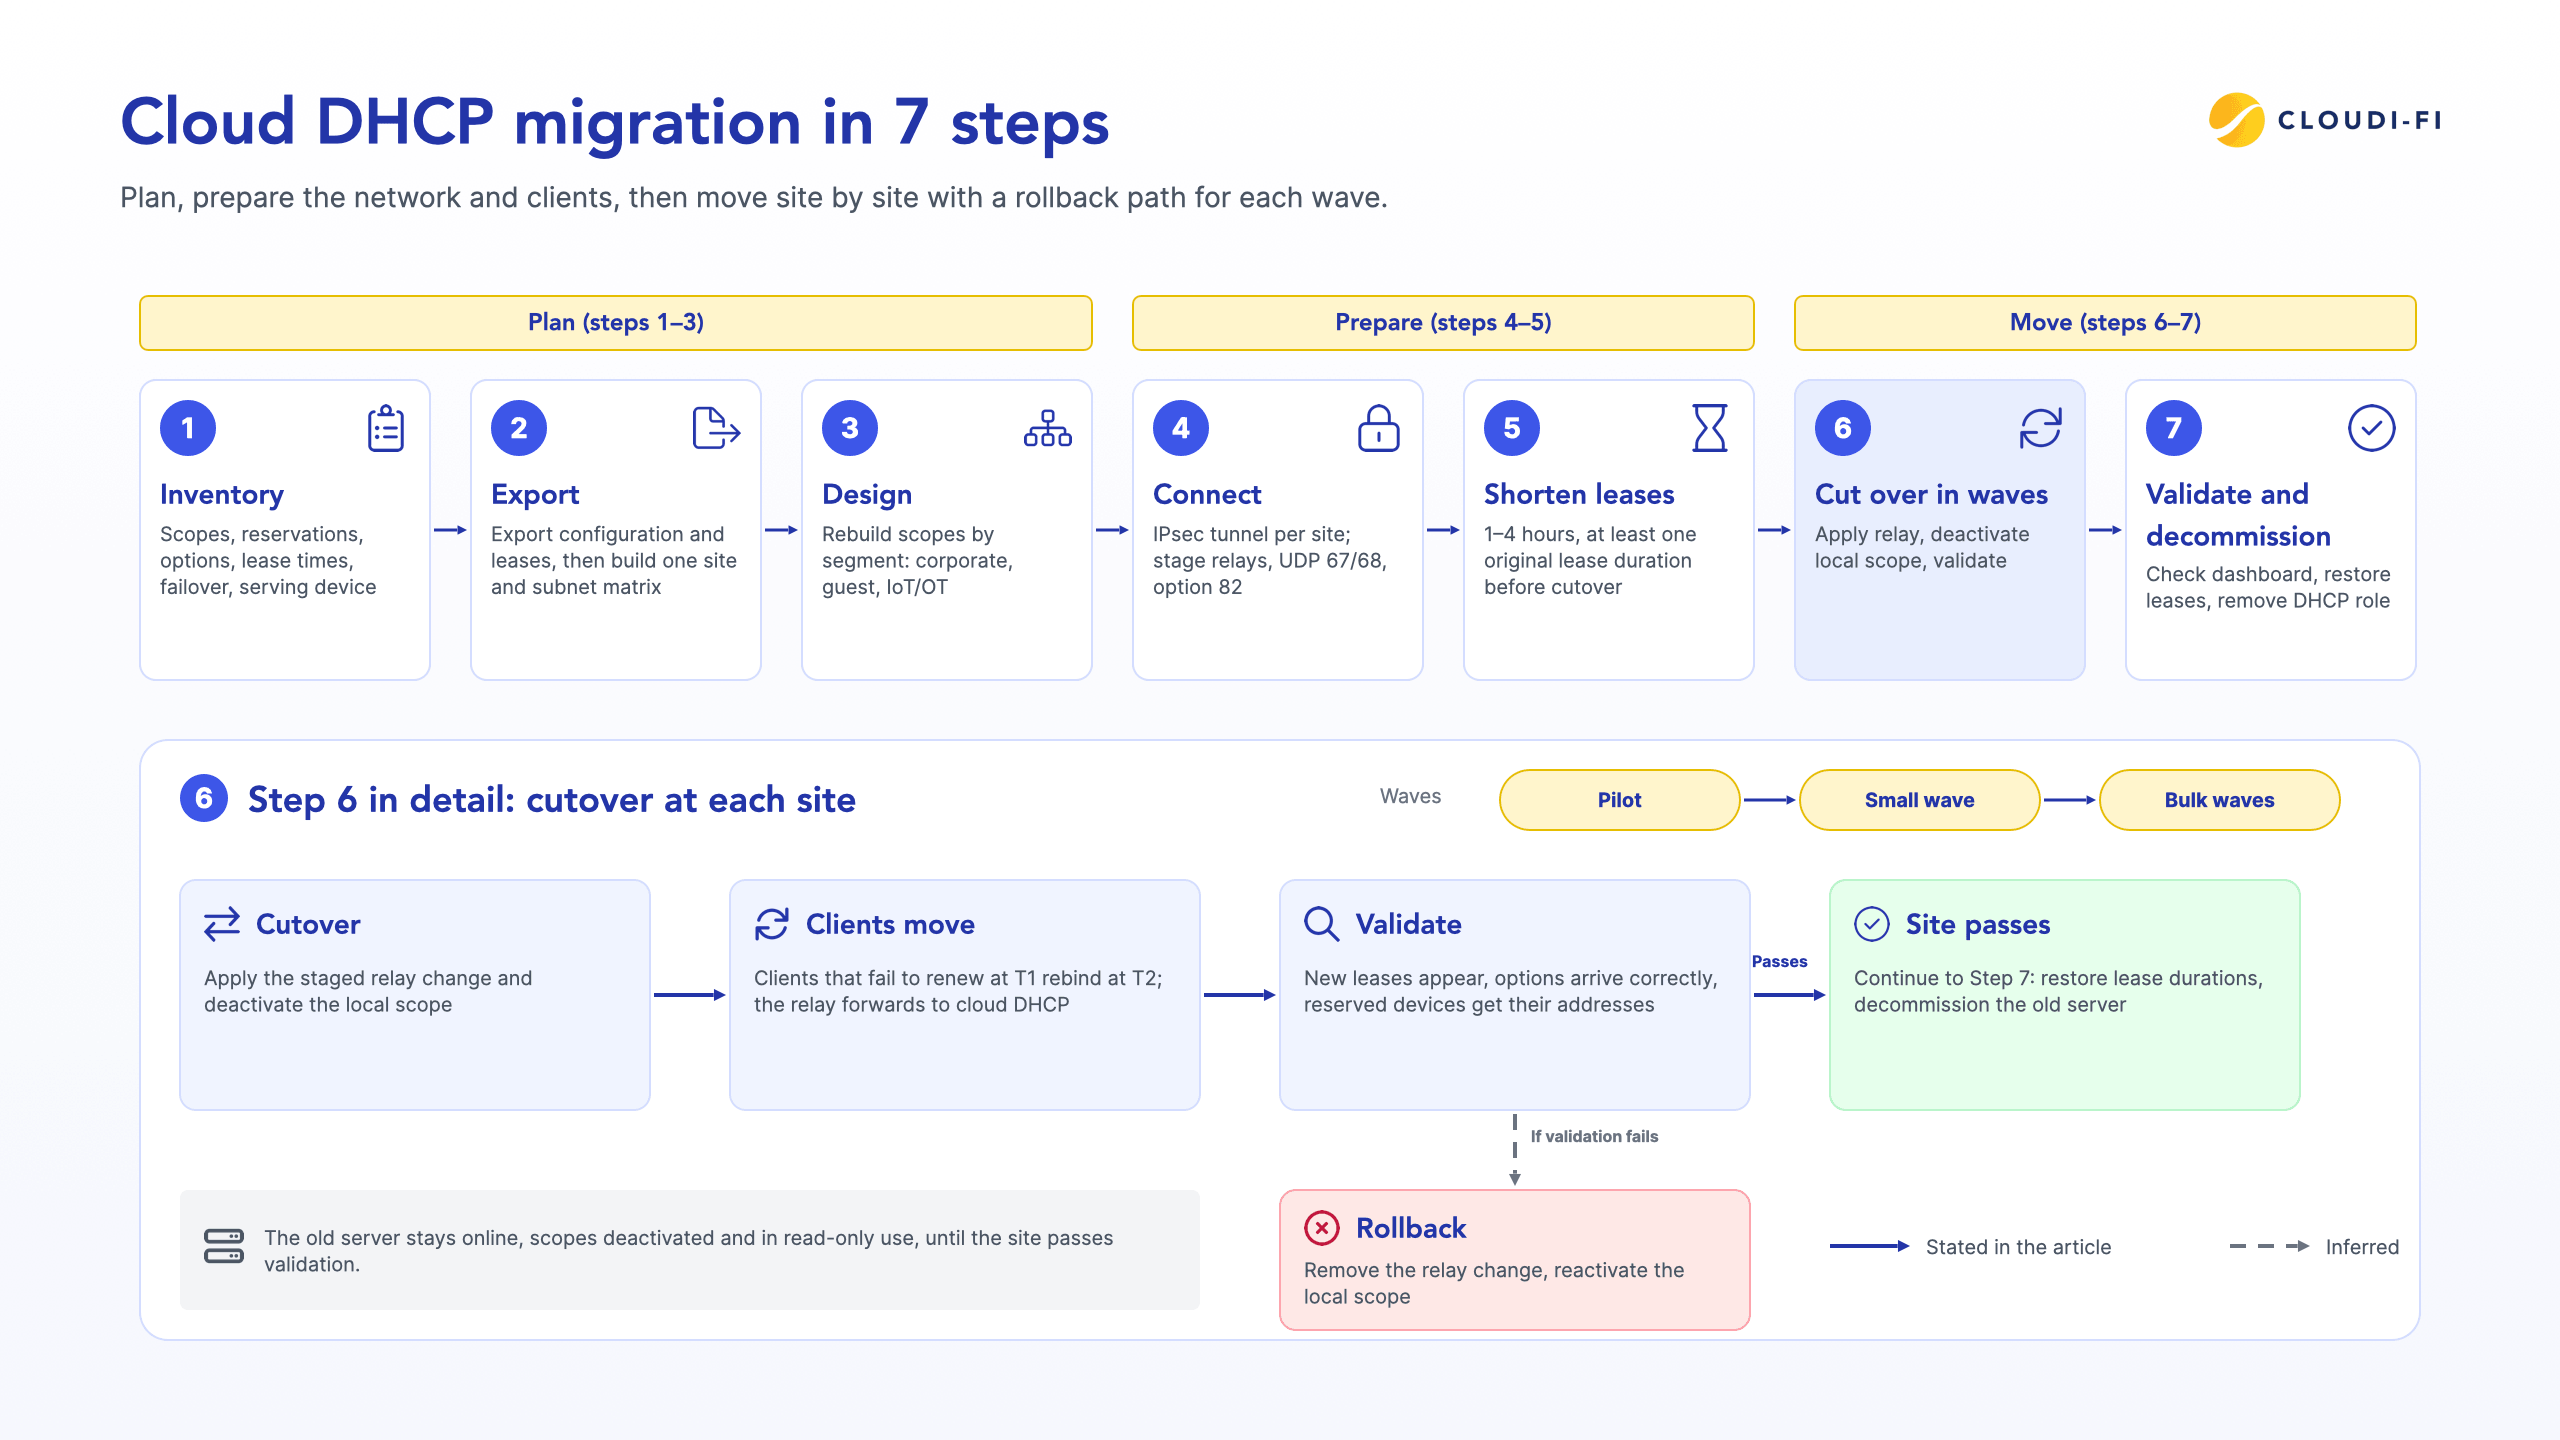
Follow these steps in order. Steps 1 to 3 cover planning, steps 4 and 5 prepare the network and clients, and steps 6 and 7 complete the move.
Step 1: Inventory every scope, reservation and option
Start with a complete record of what each site's DHCP service does today. A missed option or reservation shows up later as a broken printer, phone or badge reader.
Document these items for every subnet:
- Scopes and exclusions: Address ranges, excluded addresses and the subnet mask for each pool.
- Reservations: Each fixed media access control (MAC) address to IP address mapping, with its device owner.
- Options: Router (3), Domain Name System servers (6), domain name (15), time servers (42), boot server and file (66/67) and vendor data (43).
- Lease durations: The current lease time per scope, which you will change in Step 5.
- Failover relationships: Any partner servers and whether they run for redundancy or load balancing.
- Serving device: Whether a Windows server, router or firewall answers each subnet.
The last item matters at small sites, where DHCP often runs on the firewall or router.
Step 2: Export the existing configuration
On Windows Server, run Export-DhcpServer with the -Leases parameter. Microsoft documents that this cmdlet exports the server configuration, including all IPv4 and IPv6 scopes, and adds lease data with -Leases.
Import-DhcpServer reads the same file back, so the export doubles as your rollback backup. For routers and firewalls, export the running configuration and extract the DHCP pool sections.
Then normalize everything into one site and subnet matrix. Use one row per subnet, with scope, options, reservations, lease time and serving device in columns. This matrix becomes the build sheet for Step 3.
Step 3: Design scopes and policies in the cloud
Rebuild each site's scopes in the cloud DHCP service from your matrix. Keep subnet addressing the same where you can, so routing, firewall rules and reservations stay valid.
Segment scopes by device type:
- Corporate: Managed laptops and phones on corporate subnets, with standard lease times.
- Guest: Visitor devices on isolated subnets, with short leases that recycle addresses quickly.
- Internet of Things and operational technology (IoT/OT): Printers, cameras and sensors, with reservations or long leases.
Next, map every reservation from Step 1 to its new scope. Then set a target lease time for each segment.
Cloudi-Fi Cloud DHCP applies separate policies to IoT, guest and corporate devices. It also uses DHCP fingerprinting to identify unmanaged devices, so you see what each address belongs to.
Step 4: Connect sites with IPsec and prepare relays
Each site needs a secure path to the cloud and a relay on every client subnet. Build one IPsec tunnel per site, either from the gateway itself or through your SD-WAN fabric.
Then prepare each gateway:
- Stage the relay (IP helper) configuration on every client-facing interface, pointing at the cloud DHCP server.
- Allow User Datagram Protocol (UDP) ports 67 and 68 through local firewall rules and the tunnel policy.
- Confirm the relay inserts option 82, so the server can identify the site and circuit.
- Hold the relay change until the cutover window in Step 6.
With Cloudi-Fi Cloud DHCP, relay plus IPsec is the whole deployment model. A prepared site can go live in hours.
Step 5: Shorten lease times before cutover
Shorter leases make clients contact a DHCP server sooner, which shrinks the cutover window. RFC 2131 sets the default renewal timer (T1) at 0.5 × lease duration and the rebinding timer (T2) at 0.875 × lease duration.
At T1, a client renews with its original server. At T2, it broadcasts a rebind request, which the relay now forwards to cloud DHCP. If the cloud server can’t confirm the lease, the client restarts DORA and gets a new one.
The math shows why this matters. A client holding a 24-hour lease won't rebind for 21 hours. Cut the lease to 2 hours, and T1 falls at 1 hour while T2 falls at 1 hour 45 minutes.
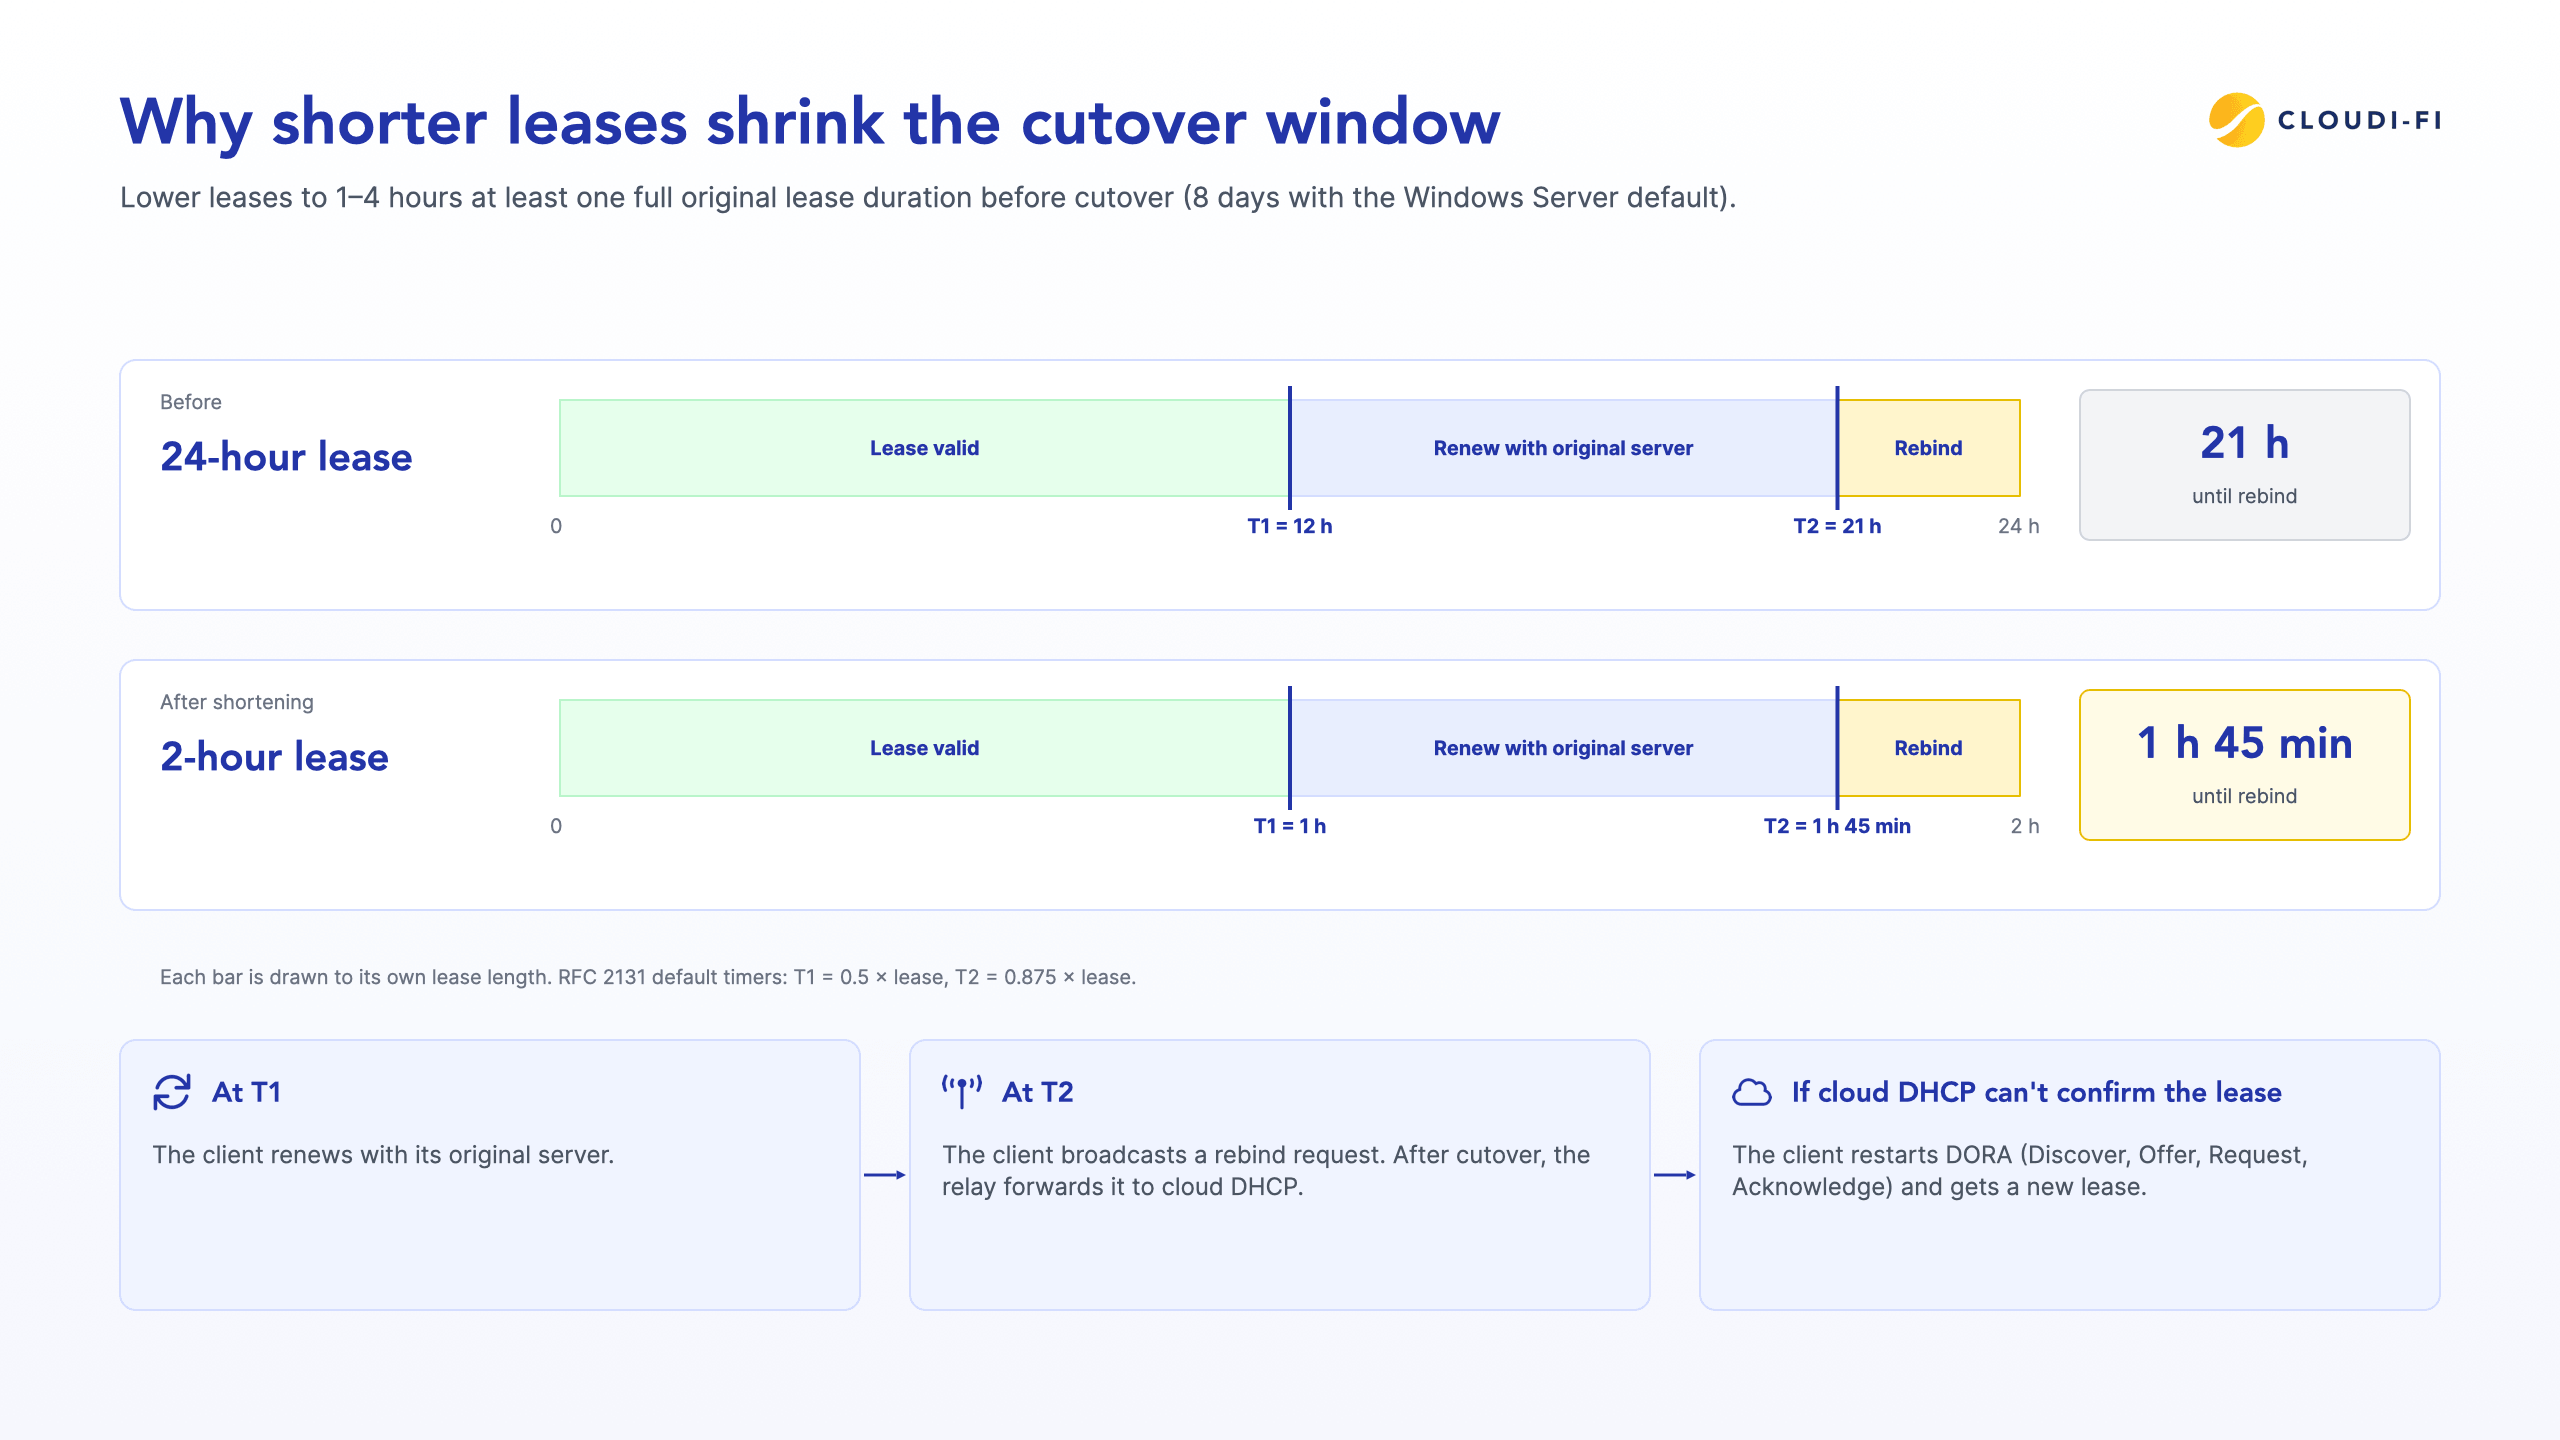
Lower leases to between 1 and 4 hours at least one full original lease duration before cutover (it could be 8 days with the Windows Server default).
Step 6: Cut over in waves with a rollback plan
Move sites in waves, so a problem affects one site and never the whole estate:
- Pilot: One representative site, ideally with guest, corporate and IoT/OT subnets.
- Small wave: A handful of sites across different regions or gateway models.
- Bulk waves: The remaining sites, grouped by region or maintenance window.
At each site, apply the staged relay change and deactivate the local scope. Clients that fail to renew at T1 rebind at T2, and the relay forwards that request to cloud DHCP. Then validate that new leases appear, options arrive correctly and reserved devices get their addresses.
Rollback reverses the same two changes: remove the relay change and reactivate the local scope. Keep the old server online with its scopes deactivated, in read-only use, until the site passes validation.
A leading banking group used this model to replace on-site DHCP servers with Cloudi-Fi Cloud DHCP over IPsec. The rollout covered thousands of branches with minimal disruption and no major network changes.
Step 7: Validate, monitor and decommission
After each wave, check the cloud dashboard before you close the change. Cloudi-Fi Cloud DHCP shows devices, subnets and leases for every site in a single dashboard.
Review these signals:
- Lease counts: Active leases per site are close to the totals in your Step 2 export.
- Pool utilization: No scope is near exhaustion while short leases are in place.
- Unknown devices: Every unidentified device is investigated or assigned a policy.
Once a site is stable, restore normal lease durations for each segment. Finally, deauthorize each Windows DHCP server in Active Directory and remove the DHCP Server role.
Cloud DHCP migration best practices and pitfalls
Most migration risk sits in the wide area network (WAN), in forgotten DHCP sources and in policy gaps. Use these checks as decision criteria before each wave.
Plan for WAN and tunnel failure
On premises, DHCP high availability came from Windows DHCP failover, which replicates scopes and active leases between two partner servers. In the cloud, resilience shifts to the network path. Build redundant tunnels per site, and set production leases long enough to cover a tunnel outage.
Find every DHCP source
Printers, firewalls, access points and consumer routers can run their own DHCP service. A forgotten one becomes a rogue server that hands out the wrong gateway after cutover. Scan each subnet for unexpected DHCP offers before and after migration.
Prevent IP conflicts from overlapping scopes
Overlapping scopes on the old server and the cloud service cause duplicate addresses. Deactivate the local scope at the moment the relay goes live. Use the exported lease data to exclude addresses still in use.
Check option 82 and the relay source interface
The relay must send traffic from an interface that routes through the IPsec tunnel, or replies won't return. Confirm that option 82 values and the relay address map to the correct site scope.
Confirm compliance and data location
DHCP logs tie devices to addresses and times, so they can fall under local data protection requirements. Cloudi-Fi global compliance support helps multi-site teams meet General Data Protection Regulation (GDPR) and regional data protection requirements across every site.
Use DHCP data for device identity
NIST SP 800-207, the Zero Trust Architecture publication, treats no asset as implicitly trusted based on network location. DHCP is the first point where a new device appears, which makes it a natural identity checkpoint. Cloudi-Fi Cloud DHCP fingerprints devices and integrates natively with Zscaler for device tagging and sub-location mapping, feeding Zero Trust Network Access (ZTNA) policy.
Frequently asked questions
Can I run cloud DHCP and on-premises DHCP in parallel?
Yes, across different sites or subnets, which is how wave migrations work. Avoid running both on the same subnet, because overlapping scopes cause IP conflicts.
What happens to DHCP if the WAN link fails?
Devices with valid leases keep their addresses and stay connected locally. New devices and expiring leases wait until the tunnel recovers, so use redundant tunnels and longer production leases.
Do I need to change IP addressing to migrate?
No. You can rebuild existing scopes and reservations in the cloud as they are, keeping subnets, routing and firewall rules unchanged.
How long does a DHCP migration take per site?
Cloudi-Fi Cloud DHCP can go live in hours once a site's relay and IPsec tunnel are ready. Total project time depends on your pilot results and how many sites you group into each wave.
Conclusion
A cloud DHCP migration comes down to seven steps: inventory, export, design, connect, shorten leases, cut over in waves and decommission. Relay and IPsec carry the traffic, option 82 identifies the site, and short leases keep the cutover window small. Run in waves with a tested rollback, the move removes a server from every branch before Windows Server 2016 support ends.
Cloudi-Fi operates across 90+ countries and 100K+ secured sites, and is trusted by 200+ enterprises worldwide. Check your infrastructure compatibility and plan your pilot site.